Reversing Sound Blaster X7 Control for fun and Linux support
My personal setup uses a single DAC to handle Bluetooth, USB and optical inputs. Unfortunately, controlling the DAC through Bluetooth is only supported on mobile. Let’s fix that.
What and Why?
The Sound Blaster X7 is a DAC (Digital Analog Converter) and amplifier. It allows several inputs to be mixed together toward a single output. Its configuration is maintained directly on the device and can be controlled by either a mobile device over Bluetooth or from a Windows machine over USB. When using my work laptop, I can’t change the X7 volume or output. This is an issue when you need to jump into a quick call as you can’t switch over to headset easily.
Since control over Bluetooth works well from the Android application, it is possible to control all the features I need over Bluetooth. There is only one issue: the only thing I’ve ever reversed is a USB msi keyboard to implement support on Linux. I don’t know much about how Bluetooth works, nor about Android and from what I could gather, I can’t live capture the Bluetooth traffic (on my device) like I did for USB.
It is nothing that can’t be fixed by a bit of reading and some work, so let’s do this.
Capturing Bluetooth traffic
Since I have no idea what I am looking for, the first thing I need is somewhere
to start. On Android, it is possible to enable Bluetooth HCI snoop log to
capture any Bluetooth traffic sent or received by my phone.
If this option works well, the plan is to:
- Enable the Bluetooth HCI log
- Connect my phone to the X7
- Do whatever I have to do
- Retrieve the log file and analyze it with Wireshark
Retrieving my first Bluetooth HCI snoop log
While the whole procedure seems easy, retrieving the file is a huge pain.
According to some tutorials, it is located in /sdcard/btsnoop_hci.log,
according to others you have to first configure the path like
this Stack Overflow thread mentions
.It can be retrieved from an adb bugreport and Google even has an awesome Python
script to extract it from the huge bug report text file.
After trying several methods, I found out that on my device, generating the
bug report moves the log file to /sdcard/MIUI/debug_log/common/com.android.bluetooth/btsnoop_hci.log.
The file is also copied inside the bug report’s FS folder which can be
retrieved without ADB.
To get a zip with a log readable by Wireshark, all I have to do is:
$ adb bugreport
Note Generating a bug report takes between 1 to 5 minutes. While it contains many different information, I’m only interested in Bluetooth traffic.
Wireshark
The log file being directly readable by Wireshark, it can be opened by simply dragging it into Wireshark. Upon opening the log file, I was greeted by this huge list of packets:
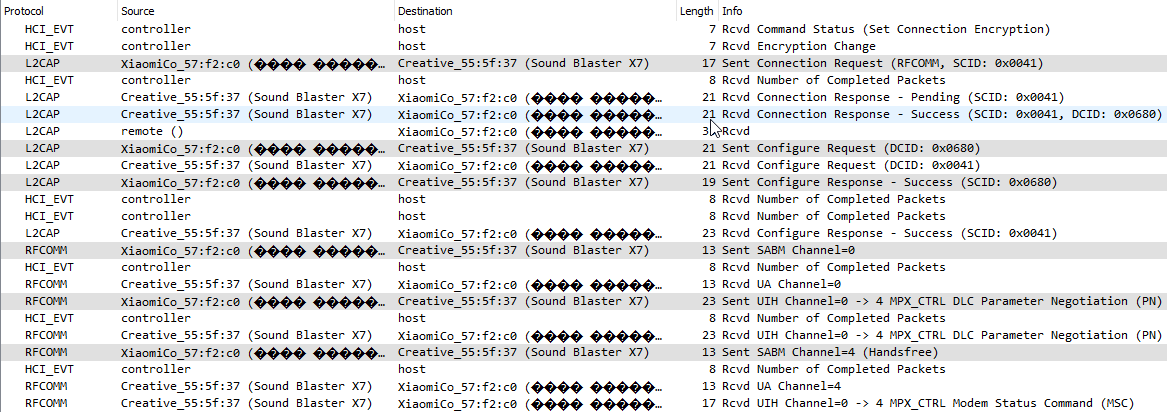
From this screenshot, we can gather several things:
- There are several protocols involved and I know none of them (yet)
- There is a lot of noise, including packets that don’t seem to belong to a connection between the X7 and my phone.
- I have unicode in my device name but I’m missing the correct fonts on Linux
Here are all the protocols used between XiaomiCo (phone) and Creative (X7 DAC), some are not on the screenshot:
- HFP: Hands-Free Profile
- SDP: Service Discovery Protocol
- AVRCP: Audio/Video Remote Control Profile
- L2CAP: Logical Link Control and Adaptation Protocol
- AVDTP: Audio/Video Data Transport Protocol
- RFCOMM: Radio Frequency Communication
From the full log, we can also see an interesting pattern. Most of the noise is related to connecting to a Bluetooth device and disconnecting from it. Between the two, there is mostly RFCOMM communication.
Note What Wireshark displays is the last protocol, RFCOMM packets are encapsulated inside L2CAP packets, themselves encapsulated inside Bluetooth HCI ACL Packets and so on. All theses protocols are not mutually exclusive.
Reading more about Bluetooth, this makes sense. This is where arbitrary data is sent. I know where to look, I now need to identify interesting packets. To find them, I will create an easily identifiable pattern by:
- Starting the application and the Bluetooth log
- Changing the Audio output between Headset and Speakers around 10 times
- Stopping the application and the Bluetooth log
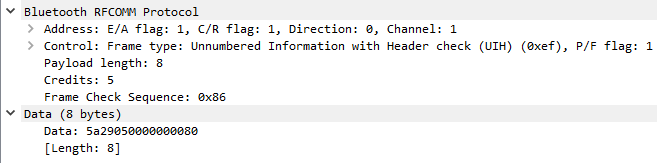
Thanks to this I identified the following data sent on RFCOMM:
5a290500010000005a2901015a290500000000805a290101
For 1 and 3, the X7 replies with a single short packet containing the data
5a02022900. For 2 and 4, however, it replies with several packets. We’ll see
later on how this works.
Replaying the traffic
To understand what these messages are doing, I’ll replay them using pybluez.
Sending a single packet is fairly straightforward:
MAC = 'xx:xx:xx:xx:xx'
CHANNEL = 1
packet = bytes.fromhex('5a29050000000080')

sock = bluetooth.BluetoothSocket(bluetooth.RFCOMM)
sock.connect((MAC, CHANNEL))
sock.send(packet)
sock.close()
Thanks to this, I was able to identify the two packets I was looking for:
5a29050001000000: Change output to Headset5a29050000000080: Change output to Speakers
Parsing packets by guessing what each byte means is a long and tedious work. While knowning what the packet as a whole does is enough to create my own software, knowing how they are structured will definitely be a huge help to provide a robust and well designed software and to actually provide all features. Fortunately, we are using an Android application to generate these packets and Android application are usually easy to decompile. Let’s step up our game and decompile X7 Control.
Decompiling X7 Control
Decompiling an APK back to Java code is can be done using Jadx and APKTool. There are also many websites doing the job for free, you simply upload your APK and it will offer you to download an archive.
The result is a directory with everything you’d expect from an Android application: assets, sources, layouts, …
Note Since we are decompiling, some data is lost. This includes variable names but also some modifications to the dataflow due to optimization done during the build phase.
Since I probably don’t have the right to publish any extract of the code, I’ll skip over the analysis of the code and directly talk about the results and logic.
Understanding what we were reading
The message packing is standard:
- Any message sent by X7 Control starts by a
STARTBYTEID. The value is 90 which translates to0x5a. - The second byte is the command ID.
0x29(41) means bothgetSpeakerConfigurationandsetSpeakerConfiguration. - The third byte is the payload length
0x05means five bytes,0x01means one byte. This allows us to know exactly how much we need to read before starting the next message. - The rest is the command payload.
For our previous packets this gives us:
5a/29/05/0001000000: Command 0x29 (41) with a payload of 5 bytes00010000005a/29/05/0000000080: Command 0x29 (41) with a payload of 5 bytes00000000805a/29/01/01: Command 41 with a payload of 1 byte:01.
In this command, the first byte of the payload discriminate between writing and
reading. 01 means getSpeakerConfiguration and 00 means
setSpeakerConfiguration. The 4 bytes after this are a 32 bit integer
representing the Speaker Configuration.
When packing data such as the integer in setSpeakerConfiguration, endianness
is reversed. The following formula is used before sending an int:
[(int & 255), (int >> 8) & 255, (int >> 16) & 255, (int >> 24) & 255]
In the previous commands, 00000080 means MIN_INT or (0x80000000)
and 0100000000 is 1 (0x00000001).
After reading the code, I found out that there are three modes for speakers and one special value:
class X7SpeakerConfiguration(IntEnum):
    TOGGLE_TO_SPEAKER = -(2**31)
    HEADPHONES = 1
    STEREO_2_0 = 2
    MULTI_CHANNEL_5_1 = 3
TOGGLE_TO_SPEAKER is what was used earlier to switch output to Speakers
(0x00000080). Since there is only one HEADPHONES mode but several speaker
modes, this allows us to switch speaker configuration without knowing
anything about the saved speaker configuration.
In addition to this configuration, MULTI_CHANNEL_5_1 can be further configured
with another command to enable or disable speakers and subwoofers:
class X7SpeakerAdvancedConfiguration(IntEnum):
    STEREO_2_0 = 1.0
    MULTI_CHANNEL_2_1 = 2.0
    MULTI_CHANNEL_3_0 = 3.0
    MULTI_CHANNEL_3_1 = 4.0
    MULTI_CHANNEL_4_0 = 5.0
    MULTI_CHANNEL_4_1 = 6.0
    MULTI_CHANNEL_5_0 = 7.0
    MULTI_CHANNEL_5_1 = 8.0
Since my setup uses STEREO_2_0, I haven’t explored this “Advanced
Configuration”.
With this, I am now able to jump in a call and switch over the headset without using my phone or desktop. This is a huge improvement!
Muting
When the X7 is muted, it can only be unmuted over Bluetooth, USB or by rotating
the hardware volume button. To mute the Sound Blaster X7, you might think the
setAudioMute command (36) is what you need. However, this command doesn’t
actually mute the output, it is actually used to mute the individual inputs
inside the Mixer.
To actually mute the X7, you have to call the setHardwareButtonState
command (38) with a byte for the button ID (8 in our case) and a byte for the
state (non-zero means muted, zero means the opposite). As a user, this is
surprising because the X7 doesn’t even have any physical mute button!
From my investigation, I found the following hardware buttons:
class X7HardwareButtons(IntEnum):
    SBX = 1
    MUTE = 8
    CRYSTAL_VOICE = 17

    # Not available on X7
    VOICE = 4
    MICROPHONE = 5
    PHONE = 7
    NOISE_REDUCTION = 9

    # Back Buttons (BP = Bluetooth Player?), Not Available on X7
    BP_PLAY = 10
    BP_PREV_TRACK = 11
    BP_NEXT_TRACK = 12
    BP_PREV_FOLDER = 13
    BP_NEXT_FOLDER = 14
    BP_PLAY_RECORDING = 15
    BP_RECORD_RECORDING = 16
Another interesting point is that there are way more buttons in the code than available on the X7. This probably means that a big part of the code is reused for other SoundBlaster products. Which is great news, it means that porting my code to other devices might actually be easy!
While working on the Mute feature, I found out that sending the command 36
(setAudioMute) with the payload [0, 0] (2 bytes filed with zeroes) leads to
the X7 switching indefinitely between muted and unmuted. Don’t do it!
When sending Hardware State changes too fast or when it decided it was a good
idea, the X7 will send a packet containing the current state of all buttons.
Each bit of the payload represents one button status. For instance 0x1 means:
SBX True
MUTE False
CRYSTAL_VOICE False
VOICE False
MICROPHONE False
PHONE False
NOISE_REDUCTION False
BP_PLAY False
BP_PREV_TRACK False
BP_NEXT_TRACK False
BP_PREV_FOLDER False
BP_NEXT_FOLDER False
BP_PLAY_RECORDING False
BP_RECORD_RECORDING False
While 0b10000001 means the same except for MUTE True, MUTE being the
8th button.
What about messages received from the X7?
From my investigation, it seems that packet can be sent or received independently. This means that you can just add your packets to a send queue and eventually you’ll receive an answer. You don’t need to actively wait for it. The X7 can send packets on its own, usually this is used to notify the client of a change (volume update or, as seen earlier, changes in the buttons states).
Messages coming from the X7 are structured exactly the same as the messages we
send. The ACK packet seen earlier (5a02022900) means:
5a: start of the message02: command ID (02meansACK)02: length of the data payload29: command ID of the command being acknowledged. Remember, we sentsetSpeakerConfigurationwhich is the command29!00: Status of the command. I do think01means error but the application doesn’t handle it, it simply ignores it and returns.
For now I implemented a simple incoming packet processing that makes it easier to debug and understand what’s going on. It works on its own thread to not block the main logic. I should probably implement a sending queue on its own thread. Since I haven’t implemented all packets, I can only display the packet ID and the payload.
To properly implement the next parts, I will need to implement more packets as I need to get information such as the minimum audio level, maximum audio level and step at runtime. While I could hardcode everything for my own X7, what would be the fun in that? It also is a good idea to handle any error returned by the X7 since I am likely sending some invalid packets to the X7.
Controlling the volume
Everything was going well. Until I tried to implement volume control. In
appearance, everything looks fine. To update the volume, you have to call
setAudioLevel (which sends command ID 35) with an index (speakerLevelIndex)
and the desired level. And this is it, nothing fancy. So what went wrong?
First, replaying doesn’t work idempotently. The same packet has different
outcomes depending on what the actual volume level is. Sending the level 0x00e5
(remember that the endianness is swapped) has all the following behaviors:
- Changes the volume from 6% to 16%
- Changes the volume from 100% to 8%
- Changes the volume from 6% to 6%
- Changes the volume from 16% to 16%
This means that there is some state somewhere that impacts this. Using
getAudioLevel and sending back this exact level doesn’t help either. The
results here are not static either, sometimes sending 0x00e5 will have a
different behavior.
Second, the scale isn’t actually in percentage. The scale seems to be in dB which is not that surprising for a DAC and especially not for an amplifier. However, this means that the application dynamically construct a mapping from percentage to the actual desired level. As far as I could tell, this mapping is built as follows:
For a given , being the index or percentage desired, the mapping maps it as follows (more or less, this might include errors as I haven’t successfully tested it yet):
What are and ? Well that’s simple:
To calculate this, you need minValueDB, maxValueDB and stepSizeDB which
can be obtained by receiving getAudioLevelRanges command (command ID 34).
I’m not certain the formula displayed above is 100% percent correct since I haven’t
tested it. Instead I dumped all the values by repeatedly calling
getAudioLevel.
But wait a second? Any value is that mapping should be idempotent when replayed, right? So what’s going on?
Errors and approximations
My first mistake was reporting the current volume as a percentage. This
percentage, reported by Windows, is exposed and synchronized by the X7 Driver.
This percentage is linear while the dB scale is logarithmic. This creates an
illusion that all values can be reached when in reality, a single step can skip
one percent. This is especially true the closer you get to 100%. There is only
two values between 90% (254) and 100% (0) but Windows allows you to go
percent by percent between the two.
My second mistake was thinking that this percentage will always be the same for the same dB level. This is basically the same mistake as the first one but the other way around. If I set 95% on Windows, record the value and set the volume to this value, the percentage can actually change but the real sound level does not.
My third mistake was thinking that this percentage was correct. By this, I mean
that any dB level can be mapped to at least one percentage without overlapping.
To my surprise, this was not true either. One example of this behavior is jumping
from ~90% (254) to ~10% (223). This can make the percentage fall to 6% which
would be 221 if set from Windows. However, the real sound level is 223 as
expected. Setting the sound level from 6% to 6% will set it to 221 thus
lowering the real sound level.
Finally, I spent a lot of time focusing on the dB scale, retrieving the
matching volume on Windows and trying to understand the steps between values.
Implementing getAudioLevel would have provided the raw values directly which
would have helped my investigations.
With all this in mind, let’s take a look again at what happened with 0x00e5:
- Changes the volume from 6% to 16% (or ~10%)
- Changes the volume from 100% to 8% (or ~10%)
- Changes the volume from 6% to 6% (a bit more subtile, but this is actually 10% too. The initial 6% was set over Bluetooth so the X7 volume doesn’t change when applying since it goes from 223 to 223)
- Changes the volume from 16% to 16% (or ~10%, same issue as 6% to 6%)
All these results were actually 223 from the beginning. The X7 volume was
correct but the reported values were wrong.
What’s next?
Right now, I have implemented the three features I needed the most: toggling mute on the X7, toggling between headset and speakers and volume control. The sound level can also be adjusted on the laptop directly to have finer precision than what is provided by the X7.
I will continue working on implementing volume control properly and documenting what I found out when needed. If you are interested in this project, please check it out on GitHub.
Some notes
After digging into the Android App source code, I found out that there is support for communication over USB. As far as I could tell, the messages sent over USB are the same as those sent over Bluetooth. I’m not sure it matches the behavior of the desktop App since there are some differences. For instance volume changes instantaneously on PC but over time on Android.
In any case, the investigation was worth it and I learned a lot from this. Sometimes the journey matters more than the destination!
Thanks
I’d like to thank Cyril Duval for proofreading this article.